Since I am running a HTPC in my living room I am dependent on having a reliable and FAST wifi connection. Running videos is one thing, but having a quick and responsive connection when it comes to fetching thumbnails for and browsing large photo files from my NAS is even more important.
Finding a good 802.11ac wifi adapter for my unit seemed to be harder then expected. Lot's of posts online told me that either 802.11ac simply won't work (you won't get your card to jump from 11n to 11ac speeds) and other challenges. Finding a pci card seemed to be even more challenging as most cards I could find with the best chipsets for Linux seemed to only be available on minipci express.
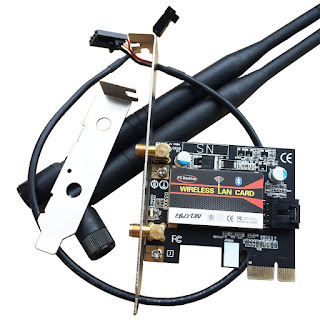
After some googling I did find that there were adapters for minipci express to pcie x1. I also did find one readily mounted with antennas, CE branded and at a reasonable price on
ebay. The intel 8260AC is one of the latest chipsets running on 802.11ac offering a theretical speed up to 867 Mbps. The intel chipsets also offer good linux drivers. Installing the card was easy, the only thing I actually had to do was to make sure the iwlwifi package was installed, and to upgrade the kernel package of my Linux Ubuntu 14.04 distro, as the kernel package I was running used an older version of iwlwifi not offering support of the 8260 chipset yet. I took a full leap and went for kernel 4.4. After this everything wen't smoothly. No problems at all. The only thing is when I run iwconfig it says the card is running 802.11abgn but on 867Mbps. After some googling this seems to be a bug in the iwconfig app. The speed stated on iwconfig is the correct parameter to look at, and 867Mbps is impossible on 802.11n.
A word of advice: The ebay site selling this card states in large red letters and exclamation marks "This item don't compatible AMD computer motherboards". This is wrong. I have no idea why they say so. I knew this had to be wrong as there is a lot of AMD based computers running a intel wifi chip. I've had to deal with motherboard blacklists/whitelists before though. Anyhow, I am running this fine without any third party firmwares at all on a AMD motherboard running a AMD X3 450 CPU.
